 For one 9 1/2″ black tart pan with removable bottom or about six 4″ tart shells.
This recipe entails a technique that I never saw before I read “Simply French” by a Joel Robuchon and Patricia Wells. It eliminates the need for Baking Blind because once you fit the dough into the tart shell, you don’t cut off the edges until it’s firmed up a bit in the oven. It also gives you a nice clean edge. If you don’t want to use this process it’s still a good dough and you can cut off the excess dough with a knife or your rolling pin. if you bake it from a frozen state, you don’t have to bake it blind. You can add or subtract flavorings from this recipe. For example, you could substitute lemon rind for the vanilla or use some spice like ginger or cardamon or some combination of warm spices like ginger, nutmeg, star anise and cinnamon. You can substitute different kinds of nuts like walnuts, macadamia nuts, hazelnuts or pecans or coconut. It doesn’t have an intense nut flavor, although you could increase the intensity by using roasted nuts. The nuts are really there to make a more delicate crust.
A note about the difference between a pate sablee and a pate sucree: it’s really the method you use to mix the ingredients that differentiates them from each other. A pate sucree can be done with either the creaming method or the sablage method whereas a pate sablee will always be done with the sablage method. The aim of the creaming method is to cream the liquid ingredients with the butter and sugar and then add the flour, like making cookie dough. There is generally so much fat in the recipe that the liquid ingredients don’t penetrate the flour.The aim of the sablage method (which literally means to make sand) is to coat individual particles of flour with the fat to protect them from any liquid ingredients. This prevents the gluten from being activated, which would result in a tough crust. It also creates a sandy texture. I find that the same recipe made with the sablee method is a bit more tender, but I have also found that it doesn’t hold up quite as well under refrigeration as the creaming method. So, I use the pâte sucrée for tarts where the shell is fully baked and filled with pastry cream or an unbaked curd and fresh fruit. I use the pâte sablée for tarts that are cooked because the cooking eliminates a lot of moisture in the filling.
INGREDIENTS
- One moist vanilla bean
- One large egg yolk, room temperature
- 12 grams (2 tablespoons) finely ground blanched almonds (or almond flour)
- 60 grams (1/2 cup) powdered sugar, sifted
- 100 grams (3/4 cup)all purpose flour, sifted
- Pinch of fine sea salt
- 5 tablespoons unsalted, cultured butter, cut into 5 pieces and softened
DIRECTIONS
- Flatten the vanilla bean and cut in half lengthwise. Scrape out the paste and place in a small bowl with the egg yolk. Stir to blend.
- In a food processor combine the almonds and sugar, salt and flour and pulse until blended.
- Scatter the pieces of butter over the dry mixture and pulse just until mixture resembles course crumbs.

- Add the egg yolk and vanilla and pulse just until dough begins to come together. Dough should not form a ball.
- Transfer dough to a sheet of plastic wrap. Gently shape into a flat circle.
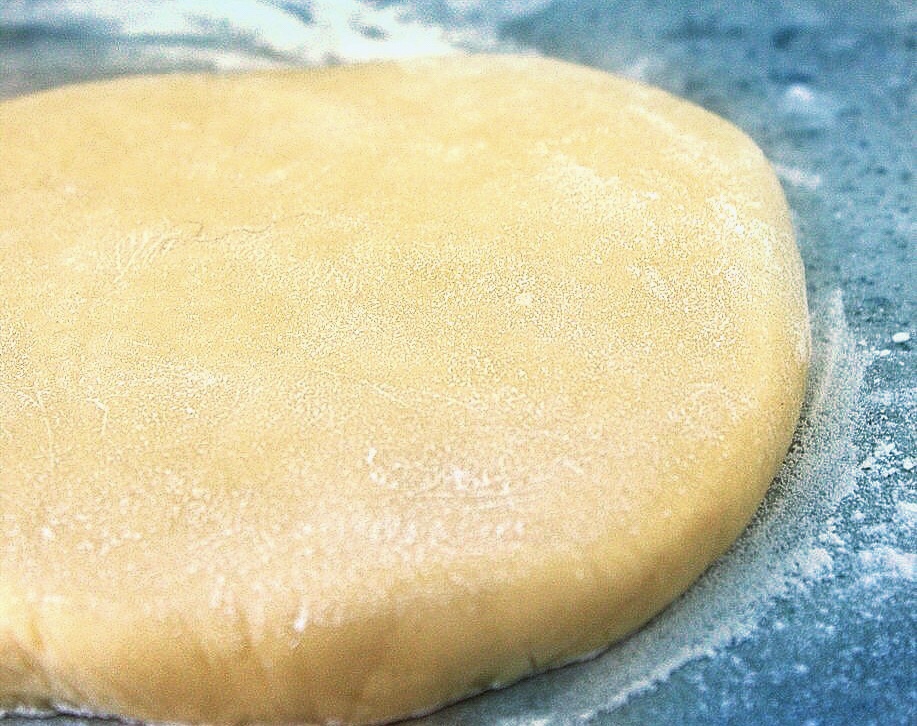
- Wrap and refrigerate for at least an hour and up to 48 hours. After 48 hours the dough might start to turn grey. You can roll it, shape it and freeze it in the tart tins as well. If well wrapped it will keep for at least a month.
- On a lightly floured surface, or between sheets of plastic wrap, guitar sheets or parchment paper, roll the dough out into a circle about 1/8″ thick (3mm). For little tarts I do /16″ or 2 millimeters. If the dough softens too much, pop it into the freezer for a few minutes. Make sure you peel the paper off from time to time so the dough can move freely and doesn’t stick to the paper.

- Cut a shape that is 2″ larger than the tart pan you will be using.
- If you are using a scalloped tart shell with a removable bottom the edges are very sharp. If you just roll the dough up on your pin and try and place it over the pan, the sharp edges tend to cut off the edges of the dough and then you end of with sides that are two short. If it happens, it’s not a tragedy as you can reinforce the sides with more dough. However, in order to avoid this extra work, for these pans i have developed the following technique: A. Take the chilled dough out of the refrigerator or even better, the freeze, as it gives you a bit more time. B. Peel off the top sheet of parchment paper, placing the bottom of the tart pan on top. Adjust the bottom of the pan so it is centered over the dough. C. Flip the dough and tart pan bottom over so the dough is now sitting on top of the tart pan. Place a piece of plastic wrap over the circle of dough and when it’s soft enough to bend without breaking, bend the edges of the dough in towards the center. D. Place the bottom of the tart pan, with the dough on top, in the the tart pan and carefully unfold the dough up against the sides of the pan, using a chopstick or the side of your finger to press the dough so it makes contact with every indentation in the edge. This way, you’ll have a better chance that the dough won’t slip while it bakes.
- If you’re using a flan ring, the edges are rounded so you can roll the dough up on your pin and roll it over the ring. The edges won’t cut off the dough. Then, with your fingertips, lift the edges of the dough so it naturally falls into the pan and gently lay the dough into the bottom of the pan. You don’t want to use pressure because you don’t want to thin the dough. Leave the overhang. You’ll cut it off later. If you’re using 4″ tart shells the technique is the same but you’ll want to cut out circles that are about 6″ in diameter. My Cuisinart disks are just the right size.
- With either the ring or the mold, prick the bottom of the dough and freeze for at least one hour.
- Preheat oven to 350 degrees Fahrenheit
- FOR A PARTIALLY BAKED TART SHELL: Place the tart on a sheet pan and place in the oven. Bake for about five minutes until it begins to firm up. Remove from the oven and with a sharp knife trim off the overhang by laying the blade on the edge of the tart ring and slicing away from you at an angle. Return it to the oven and bake until the tart is light brown around the edges around 8 minutes. Remove from the oven and completely cool before proceeding with the recipe.
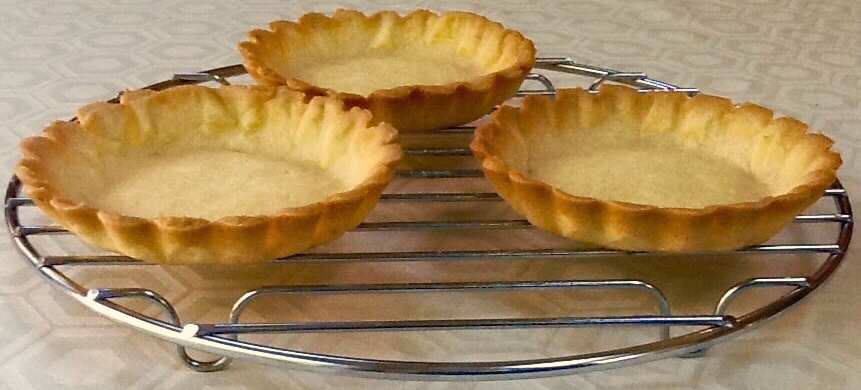
- FOR A FULLY BAKED TART SHELL: proceed as for a partially baked shell but cook an additional 20 minutes or a total of 35 minutes until the shell is golden brown or until the color is as you like it. Remember, a well browned crust will have the best flavor.
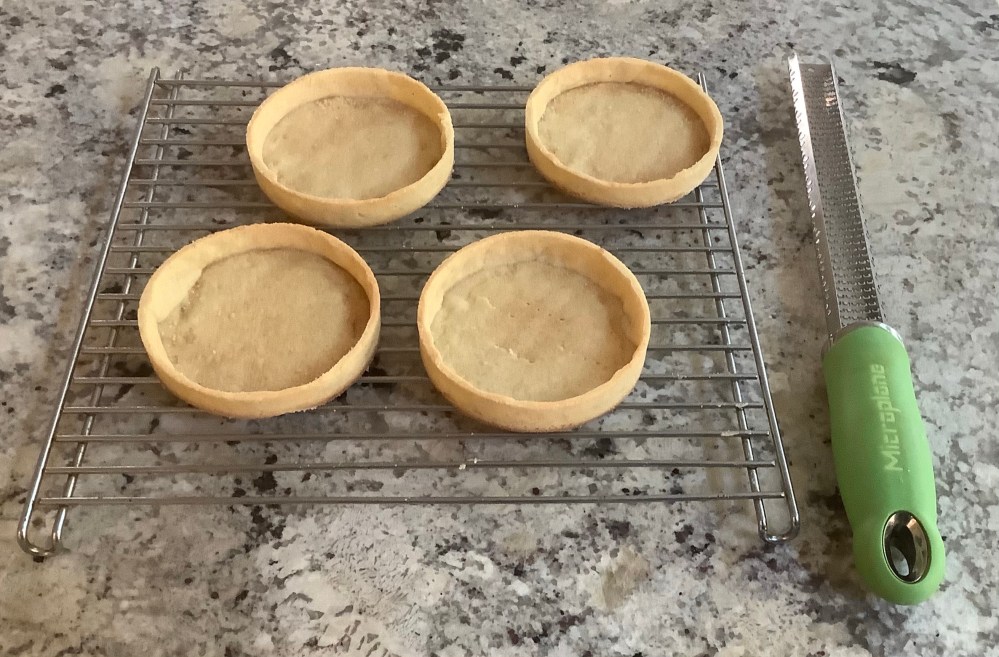
- Once the shells have cooled, I like to take a micro plain and gently sand the tops of the tarts and the bottom edge,where the sides meet the bottom, to get flat tops and clean edges.
© Julie de Lara and onemorebitedelara.com 2018
